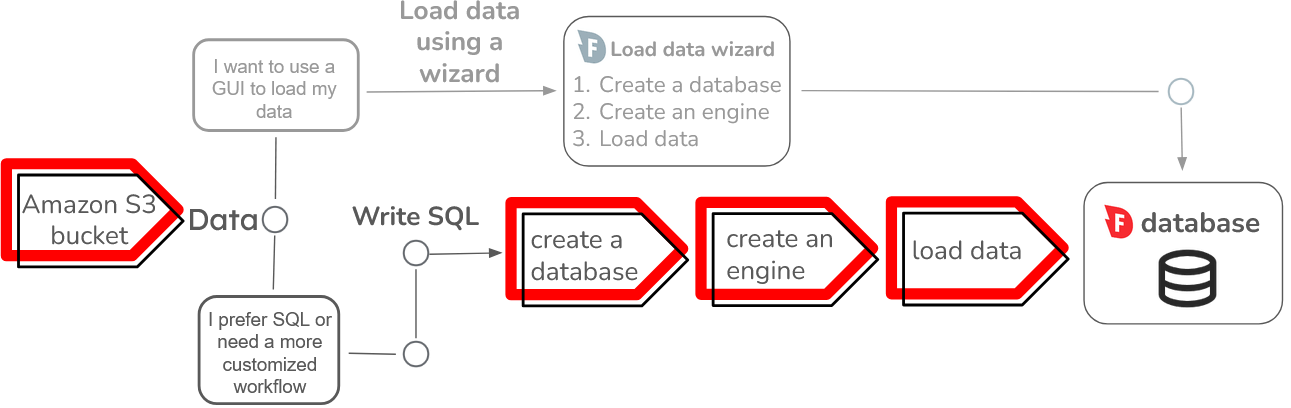
Before you can load data using a SQL script, you must register with Firebolt, and create a database and an engine.
- The simplest COPY FROM workflow
- Define a schema, create a table, and load data
- Load multiple files into a table
- Filter data before loading using OFFSET and LIMIT
- Aggregating data during data load
- Update an existing table from an external table
- Load source file metadata into a table
- Continue loading even with errors
- Log errors during data load
The simplest COPY FROM workflow
Although there are many options to handle different data loading workflows,COPY FROM requires only two parameters:
- The name of the table that you are loading data into.
- A location to load the data from.
COPY FROM is:
tutorial, reads a CSV file with headers from a public Amazon S3 bucket, automatically generates a schema, and loads the data.
If the data is contained in an Amazon S3 bucket with restricted access, you will need to provide credentials. The following example shows how to provide credentials and read a file with headers, and automatically generate a schema:
Static Credentials
Replace<aws_access_key_id> with an AWS access key ID associated with an AWS user or IAM role. The access key ID is a 20-character string (e.g., AKIAIOSFODNN7EXAMPLE).
Replace <aws_secret_access_key> with the AWS secret access key associated with the AWS user or IAM role. The secret access key is a 40-character string (e.g., wJalrXUtnFEMI/K7MDENG/bPxRfiCYEXAMPLEKEY). You can also specify an AWS_SESSION_TOKEN.
Example:
Assume Role Authentication
Replace<aws_role_arn> with your role’s Amazon Resource Name (ARN) of the IAM role that you want Firebolt to assume. This method gives Firebolt temporary credentials to authenticate and access your Amazon S3 bucket.
Example:
Define a schema, create a table, and load data
You can also load data into an existing table using your own schema definition. Manually defining your own schema, can give you finer control over data ingestion. This example contains the following two steps:-
Create the target table.
Create a table to load the data into, as shown in the following code example:
The previous code example creates a table named
levels, and defines each of the columns with a name and data type. For more information about the data types that Firebolt supports, see Data types. -
Run COPY FROM.
Use COPY FROM to load the data from an Amazon S3 bucket into the levels table, as shown in the following code example:
The previous code example reads data from a Firebolt test data set from the fictional “Ultra Fast Gaming Inc.” company. The
levelsdata set is in CSV format, but you can also useCOPY FROMto read files inParquetformat. If you are reading in aCSVfile and specifyHEADER = TRUE, then Firebolt expects the first line of your file to contain column names.
Load multiple files into a table
You can use thePATTERN option in COPY FROM to load several files at the same time from an Amazon S3 bucket. The PATTERN option uses standard regular expressions. For more information about regular expressions, see the Wikipedia glob programming article.
COPY INTO: Specifies the target table to load the data into.FROM: Specifies the S3 bucket location of the data.PATTERN='*.parquet': Uses a regular expressions pattern with wildcards (*) to include all Parquet files in the directory.AUTO_CREATE=TRUE: Automatically creates the table and the schema if the table does not already exist. Parquet files include rich data, and typically have schema information for simple and high-fidelity schema creation. Specifying AUTO_CREATE to TRUE ensures the schema in the Parquet file is preserved after loading.TYPE=PARQUET: Specifies the data format as Parquet.
Filter data before loading using OFFSET and LIMIT
You can useCOPY FROM with the LIMIT and OFFSET clauses to filter out data before you load it into Firebolt. The following example demonstrates how to filter the source data by skipping the first five rows of data and inserting only the next three rows.
OFFSET: Specifies a non-negative number of rows that are skipped before returning results from the query.LIMIT: Restricts the number of rows that are included in the result set.TYPE=CSV: Specifies the data format as CSV.HEADER: Specifies that the first row of the source file contains column headers.
OFFSET and LIMIT, see SELECT Query Syntax.
Aggregating data during data load
If you frequently use aggregate functions such asCOUNT, MAX, or SUM, you can perform these aggregations on top of an external table without loading the raw data into Firebolt. This approach allows you to avoid costs associated with importing and storing the dataset, particularly if you don’t need to store the originating data set.t.
The following example shows how to aggregate data using an external table. Then, define a table in the Firebolt database with the desired aggregations. Finally, insert data from the external table into the internal table. This example contains the following three steps:
-
Create an external table linked to files in an Amazon S3 bucket.
The following code creates an external table that links to files in Amazon S3 bucket. The table has a defined schema that matches the type and names of the originating data:
The previous code uses
OBJECT_PATTERNto link all (*) files inside the specified directory contained inURL, andTYPEto specify the file format. -
Define a table in the Firebolt database with the desired aggregations, as shown in the following code example:
The previous code creates a table with the aggregate values
MaxCurrentLevel,MaxCurrentSpeed, andMaxCurrentScore. - Insert data from the external table into the internal table using the aggregate functions, as shown in the following code example:
MAX before loading the data into the playstats_max_scores table.
Update an existing table from an external table
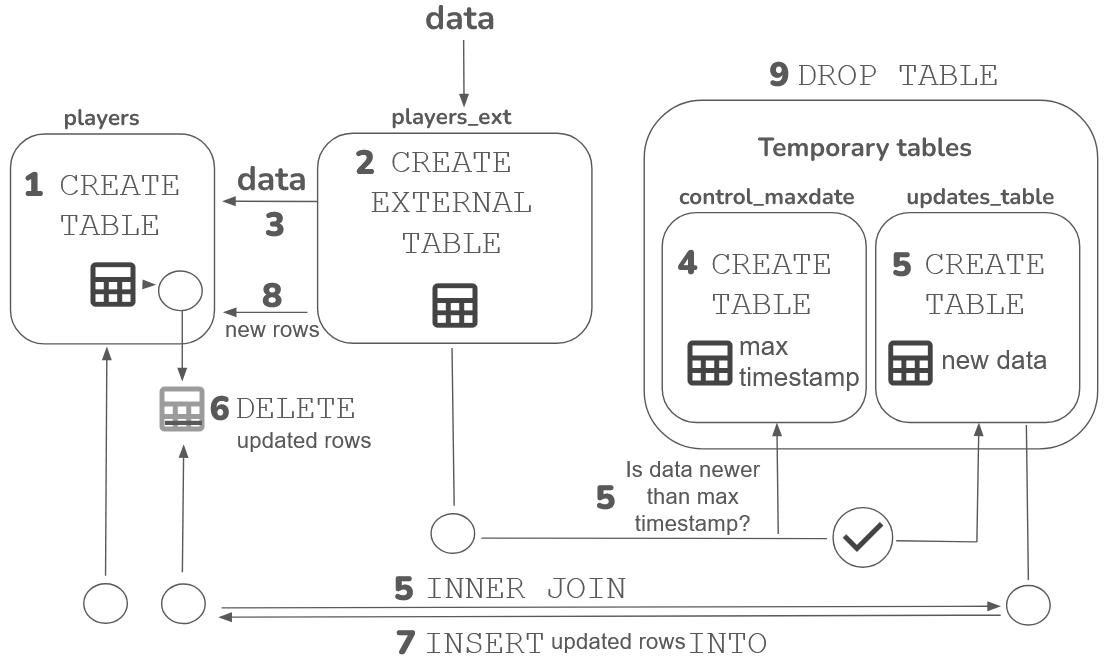
Firebolt saves metadata including virtual columns, and the source file’s name, size and timestamp when mapping data from an Amazon S3 bucket to a Firebolt database. You can query this metadata directly for troubleshooting and analysis, or use it to find new data, as shown in this example. To load only new and updated data from an Amazon S3 bucket into an existing table, use an external table and two temporary tables. This section guides you through creating a new table, which will serve as the existing table in a complete example. If you already have an existing table, its schema definition must include the file timestamp and file name metadata. For more information about these metadata columns, see Using metadata virtual columns in Work with external tables. The full workflow involves creating an internal source data table, an external table linked to the source data, and two temporary tables for the latest timestamp and updated data. Theupdates_table selects new data and uses an inner join to insert these records into your existing table, as illustrated in the diagram below:
-
Create a table
The following code example shows you how to create a
playerstable from a sample players dataset, and then copy data from a parquet file in an Amazon S3 bucket into it:The previous code example defines the schema for the players table, which includes the metadata columnsSOURCE_FILE_NAMEandSOURCE_FILE_TIMESTAMP. -
Create an external table
Use an external table to query the source data directly to compare it to data in your existing table. The advantages of using an external table to check for new data are as follows:
- An external table links to the data source without loading it into a database, which avoids costs associated with importing and storing it.
- Using an external table isolates data operations to reduce the risk of corrupting data contained in the main
playerstable.
The previous code example defines the schema for parquet data and links to all parquet files in the Amazon S3 bucket that contains the source data. If you are using an external table to link to data in parquet format, the order of the columns in the external table does not have to match the order of the columns in the source data. If you are reading data in csv format, the order must match the order in the source data. -
Copy data from the
players_extexternal table into an internalplayerstable, as shown in the following code example: -
Create a temporary table that contains the most recent timestamp from your existing table, as shown in the following code example:
The previous code example uses an aggregate function
MAXto select the most recent timestamp from the existingplayerstable. -
Create a temporary table to select and store data that has a newer timestamp than that contained in the control_maxdate table, as shown in the following code example:
The previous code example creates an
updates_tableusing aSELECTstatement to filter out data that is older than the previously recorded timestamp. The code includes a table aliase, which refers toexternal_table, and the table aliasf, which refers to theplayerstable. TheINNER JOINusesplayeridto match rows in the external table to those in theplayertable, and then updates theplayerstable. -
Delete records from the original players table that have been updated, based on matching player IDs in the
updates_table, as shown in the following code example: -
Insert updated records from the
updates_table, including a new timestamp, into theplayerstable to replace the deleted records from the previous step, as shown in the following example: -
Insert any entirely new, rather than updated, records into the
playerstable, as shown in the following code example: -
Clean up resources.
Remove the temporary tables used in the update process as shown in the following code example:
Load source file metadata into a table
When you load data from an Amazon S3 bucket, Firebolt uses an external table which holds metadata about your source file to map into a Firebolt database. You can load metadata from the virtual columns contained in the external file into a table. You can use the name, timestamp and file size to determine the source of a row of data in a table. When adding data to an existing table, you can use this information to check whether new data is available, or to determine the vintage of the data. The external table associated with your source file contains the following fields:source_file_name- the name of your source file.source_file_timestamp- the date that your source file was modified in the Amazon S3 bucket that it was read from.source_file_size- the size of your source file in bytes.
levels_meta table, which contains only the metadata:
Continue loading even with errors
By default, if Firebolt runs into an error when loading your data, the job will stop loading and end in error. If you want to continue loading your data even in the presence of errors, setMAX_ERRORS_PER_FILE to a percentage or integer larger than 0. COPY FROM will then continue to load data until it exceeds the specified percent based on the total number of rows in your data. If you enter an integer between 0 and 100, COPY FROM will interpret the integer as a percentage of rows. You can specify only 0% or 100%.
For example, if MAX_ERRORS_PER_FILE is set to 0 or 0%, COPY FROM will load data until one row has an error, and then return an error. Setting MAX_ERRORS_PER_FILE to either 100 or 100% allows the loading process to continue even if every row has an error. If all rows have errors, no data will load into the target table.
The following code example loads a sample CSV data set with headers, and will finish the loading job even if every row contains an error.
COPY INTO new_levels_auto: Creates a new table namednew_levels_auto. TheINTOclause is optional. If the table already exists,COPY FROMwill add the rows to the existing table.FROM: Specifies the S3 bucket location of the data. In this example, the dataset is located in a publicly accessible bucket, so you do not need to provide credentials.AUTO_CREATE=TRUE: Creates a target table and automatically infers the schema.HEADER=TRUE: Specifies that the first row of the source file contains column headers.TYPE: Specifies the data format of the incoming data.MAX_ERRORS_PER_FILE: Specified as an integer or literal text. In the previous example,MAX_ERRORS_PER_FILEuses text.
Log errors during data load
COPY FROM supports an option to generate error files that describe the errors encountered and note the rows with errors. To store these files in an Amazon S3 bucket, you must provide credentials to allow Firebolt to write to the bucket.
The following example sets an error handling threshold and specifies an Amazon S3 bucket as the source data and another to write the error file:
COPY INTO: Specifies the target table to load the data into.FROM: Specifies the S3 bucket location of the data.CREDENTIALS: Specifies AWS credentials to access information in the Amazon S3 bucket that contains the source data. AWS AssumeRole authentication is used for dynamic, temporary credentials. For more Information about credentials and how to set them up, see The simplest COPY FROM workflow.- Error Handling:
MAX_ERRORS_PER_FILE = ‘100%’: Allows errors in up to100%of the rows per file before the load data job fails.ERROR_FILE: Specifies the Amazon S3 bucket location to write the error file.
HEADER = TRUE: Indicates that the first row of the CSV file contains column headers.
COPY FROM process encounters errors, two different files will be generated in your bucket. The following queries show you how to load these error files into new tables so that you can query and examine the error details and the corresponding rows.
The following query loads the error_reasons csv file, which contains a header with column names:
MAX_ERRORS_PER_FILE, ERROR_FILE, and ERROR_FILE_CREDENTIALS to manage how errors are handled, ensure data integrity, and record errors for future review. For more information about ERROR_FILE or ERROR_FILE_CREDENTIALS, see the Parameters section of COPY FROM.