🧪 Preview (Beta)
Suitable for production read workloads.
Most PostgreSQL driver features are supported; some PostgreSQL features may not yet be tested and could behave differently or not work in some tools.
Suitable for production read workloads.
Most PostgreSQL driver features are supported; some PostgreSQL features may not yet be tested and could behave differently or not work in some tools.

ℹ️ Network access requirement
QuickSight does not support mutual TLS (mTLS). In most cases, connections work without additional setup.
If you encounter connectivity issues, your QuickSight IP address may need to be allowlisted by Firebolt. See Allowlisting QuickSight IP Addresses.
QuickSight does not support mutual TLS (mTLS). In most cases, connections work without additional setup.
If you encounter connectivity issues, your QuickSight IP address may need to be allowlisted by Firebolt. See Allowlisting QuickSight IP Addresses.
Step 1: Create a New Data Source
⚠️ QuickSight limitations (important)
AWS QuickSight enforces a PostgreSQL-style limit on the username length.The full username value:
Service account ID requirement
Firebolt service accounts with a 57-character client ID cannot be used with QuickSight.To connect QuickSight to Firebolt, you must use a service account with a shorter client ID (26 characters).If the service account you are using has a 57-character client ID, create a new service account with a shorter ID and use it for the connection.Engine name length
If the combined username exceeds 63 characters due to a long engine name, rename the engine to a shorter name for use with QuickSight.These constraints are specific to QuickSight and PostgreSQL compatibility, not Firebolt itself.
AWS QuickSight enforces a PostgreSQL-style limit on the username length.The full username value:
<account_name>:<engine_name>:<service_account_id> must be 63 characters or fewer.If this limit is exceeded, QuickSight fails with a generic
“Something went wrong” error and the connection request does not reach Firebolt. Service account ID requirement
Firebolt service accounts with a 57-character client ID cannot be used with QuickSight.To connect QuickSight to Firebolt, you must use a service account with a shorter client ID (26 characters).If the service account you are using has a 57-character client ID, create a new service account with a shorter ID and use it for the connection.Engine name length
If the combined username exceeds 63 characters due to a long engine name, rename the engine to a shorter name for use with QuickSight.These constraints are specific to QuickSight and PostgreSQL compatibility, not Firebolt itself.
- From the left navigation pane, choose Datasets.
- Select the Data sources tab.
- Choose Create data source (top right).
-
Choose the PostgreSQL data source card.

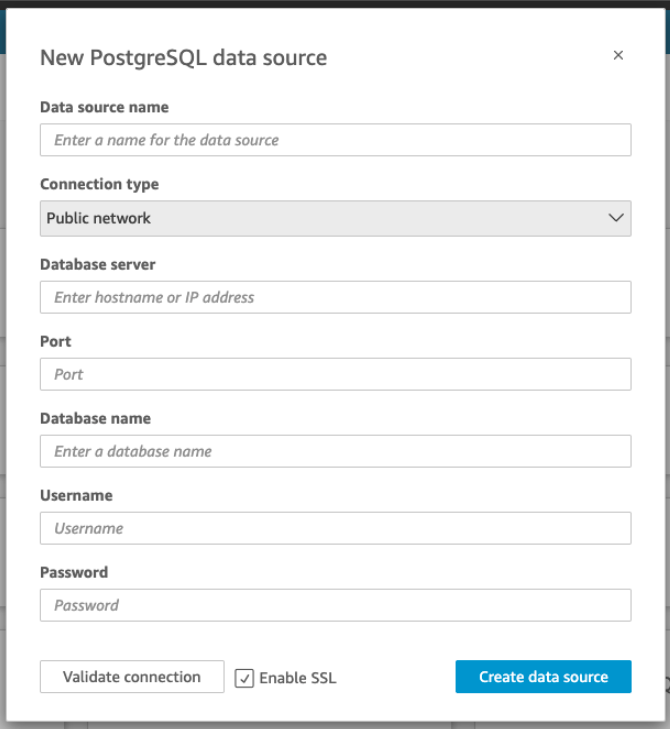
- For Data source name, enter a descriptive name for your Firebolt data source connection. Because you can create many datasets from a connection to Firebolt, it’s best to keep the name simple.
- For Connection type, only Public is available so leave it as is.
-
Fill out the connection parameters using the values specified in the following table:
Host details
When using Firebolt’s PostgreSQL-compatible interface, the host URL is based only on the region. Host URL Format:pg.<region_name>.app.firebolt.io<region_name>— The region your account is hosted in (e.g.,us-east-1)- How to Find Your Region: Use this SQL query in Firebolt to get the region for your account:
User field details
Unlike traditional PostgreSQL databases, Firebolt uses a composite string in the User field to specify:- Account name
- Engine name
- Service account ID
:separators in a single string:For example, if your account name ismy_account, your engine name isanalytics_engine, and your service account id isfbcid_xxxyou would entermy_account:analytics_engine:fbcid_xxx. - To verify the connection is working, choose Validate connection.
- To finish and create the data source, choose Create data source.
Step 2: Create a QuickSight Dataset
After you create a Firebolt data source, you can use it to create a dataset for analysis. To create a dataset using a Firebolt data source, follow these steps:- From the left navigation pane, choose Datasets.
- Choose Create dataset (top right).
- From the list of existing data sources, select the Firebolt data source you created.
- Choose Select.
- To specify the table you want to connect to, first select the Schema you want to use.
- For Tables, choose the table that you want to use. If you prefer to use your own SQL statement, select Use custom SQL.
- When prompted to choose a dataset creation mode, select Directly query your data. Firebolt is designed to provide high-performance query execution, so Direct Query is recommended in most cases. (Optional) You may choose Import to SPICE if you specifically require SPICE-based features or caching behavior.
- Choose Edit/Preview.
-
(Optional) To add more data, use the following steps:
- Choose Add data in the top right.
- To connect to different data, choose Switch data source, and choose a different dataset.
- Follow the prompts to finish adding data.
- After adding new data to the same dataset, choose Configure this join (the two red dots). Set up a join for each additional table.
- If you want to add calculated fields, choose Add calculated field.
- Clear the check box for any fields that you want to omit.
- Update any data types that you want to change.
- When you are done, choose Save to save and close the dataset.
Allowlisting QuickSight IP Addresses
Amazon QuickSight does not support mutual TLS (mTLS). If you experience connectivity issues when connecting QuickSight to Firebolt, QuickSight network access for your AWS region may need to be allowlisted by Firebolt.Request allowlisting from Firebolt Support
Contact Firebolt Support and request allowlisting, including the following information: See how to contact Firebolt Support and severity guidelines- Your name and email address
- Your organization name
- Tool: Amazon QuickSight
- QuickSight AWS region (for example:
us-east-1)