> ## Documentation Index
> Fetch the complete documentation index at: https://docs.firebolt.io/llms.txt
> Use this file to discover all available pages before exploring further.
> Learn about user permissions and how to add and remove users in a Firebolt account.
# Manage users and roles
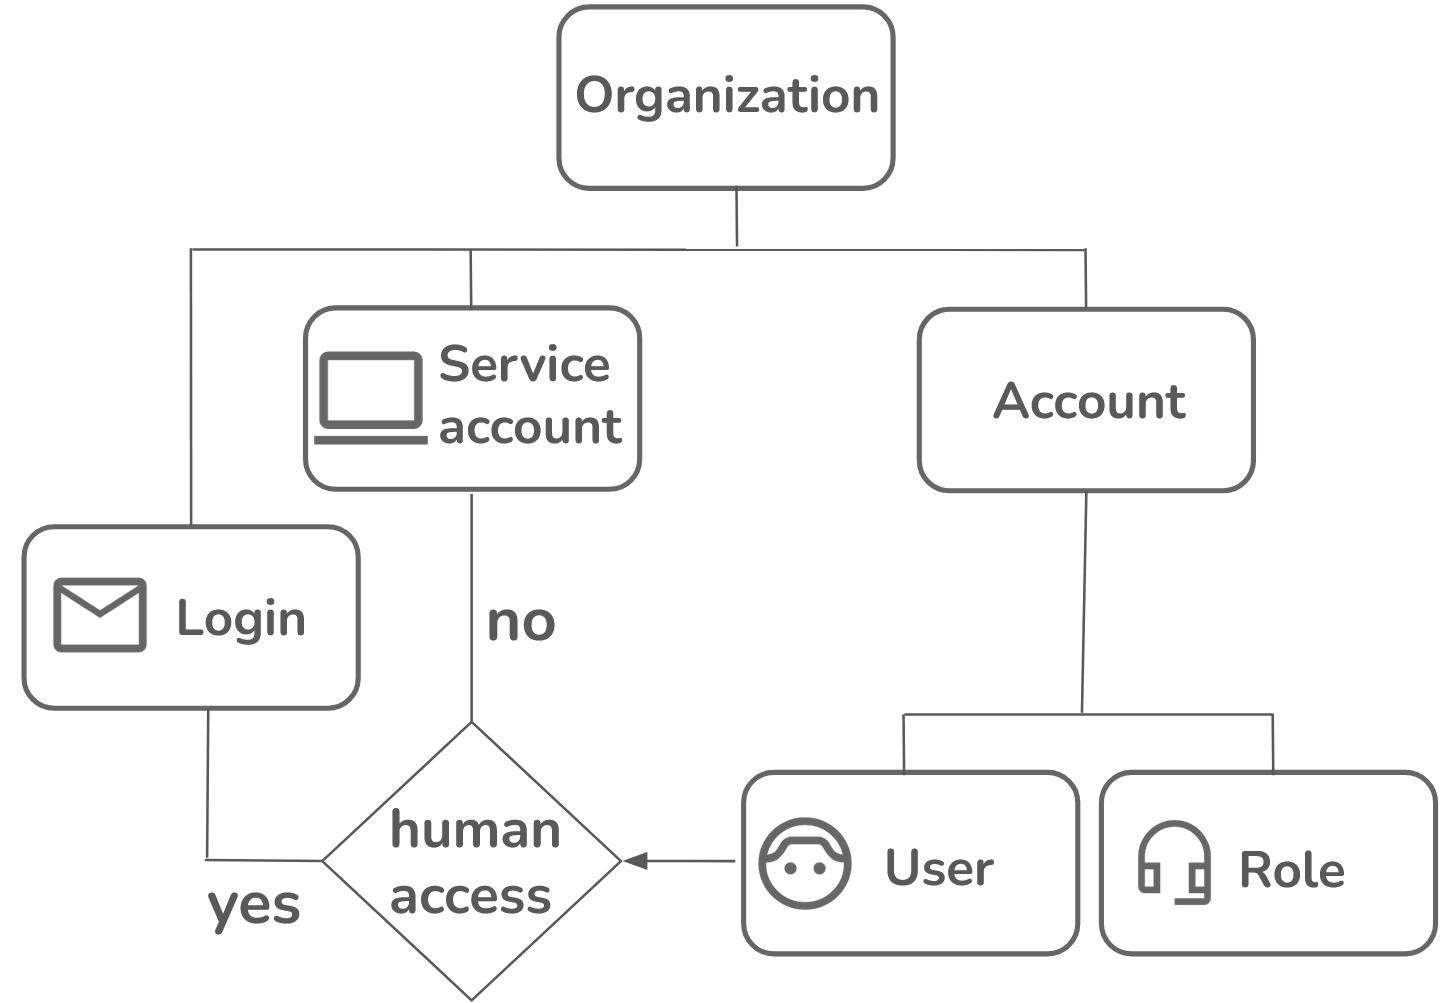
In Firebolt, an **organization** can have multiple **accounts**, each serving as a separate workspace for managing resources and data. Within each account, users are created to control access, with their identities defined through logins or service accounts. **Logins** are associated with individual human users, each authenticated by unique credentials, allowing them to interact directly with Firebolt's resources according to assigned roles. **Service accounts** provide programmatic access for applications and automated processes within the account, such as data pipelines or monitoring tools. Each login and service account is linked to specific **roles**, which define their permissions, ensuring that access is managed efficiently and securely across the organization.
##  Logins
A **login** in Firebolt represents a **human user** and is associated with an individual’s credentials, identified by an **email address**. Logins are tied to user roles, which define what the individual can access or modify. A login is primarily used for human authentication and allows a user to access the platform, run queries, and interact with databases and other resources. For instance, a login object might be created for a specific person such as `kate@acme.com`, and this login is linked to roles that control permissions.
##
Logins
A **login** in Firebolt represents a **human user** and is associated with an individual’s credentials, identified by an **email address**. Logins are tied to user roles, which define what the individual can access or modify. A login is primarily used for human authentication and allows a user to access the platform, run queries, and interact with databases and other resources. For instance, a login object might be created for a specific person such as `kate@acme.com`, and this login is linked to roles that control permissions.
##  Service accounts
A **service account** represents a **machine or application** rather than a human user. It allows automated processes to authenticate and interact with Firebolt resources. A service account is used for programmatic access, such as in pipelines, monitoring systems, application data access, and scheduled queries. Service accounts are associated with roles just like logins but are designed to operate without human intervention. For example, a service account might be used for a data pipeline that regularly ingests data into Firebolt. Each service account must be associated with a user. For more information about how to create and manage service accounts, see [Manage programmatic access to Firebolt](/guides/managing-your-organization/service-accounts).
##
Service accounts
A **service account** represents a **machine or application** rather than a human user. It allows automated processes to authenticate and interact with Firebolt resources. A service account is used for programmatic access, such as in pipelines, monitoring systems, application data access, and scheduled queries. Service accounts are associated with roles just like logins but are designed to operate without human intervention. For example, a service account might be used for a data pipeline that regularly ingests data into Firebolt. Each service account must be associated with a user. For more information about how to create and manage service accounts, see [Manage programmatic access to Firebolt](/guides/managing-your-organization/service-accounts).
##  Users
A **user** is a distinct identity that interacts with the Firebolt platform. Each user is assigned specific **roles**, which determine what actions they can perform and which resources they can access. Users are essential for controlling access in Firebolt and are managed through **role-based access control (RBAC)**. Users authenticate via **logins** or **service accounts**, depending on whether they are human users or machine-based processes.
A user must be associated with **either** a login or a service account, as follows:
Users
A **user** is a distinct identity that interacts with the Firebolt platform. Each user is assigned specific **roles**, which determine what actions they can perform and which resources they can access. Users are essential for controlling access in Firebolt and are managed through **role-based access control (RBAC)**. Users authenticate via **logins** or **service accounts**, depending on whether they are human users or machine-based processes.
A user must be associated with **either** a login or a service account, as follows:
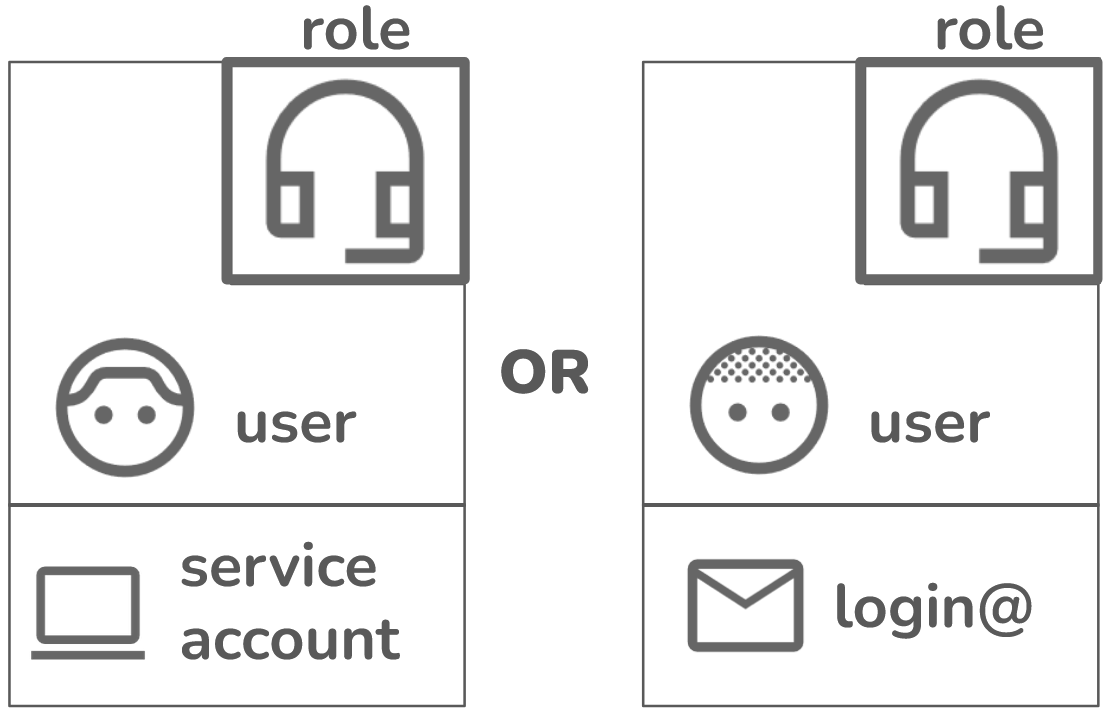 There can be multiple users per login or service account. Users are managed at the account level, as shown in the following diagram:
 You can [add](#set-up-a-new-user), [edit](#edit-an-existing-user) or [delete](#deleting-an-existing-user) users using SQL in the **Develop Space** or using the user interface (UI) in the **Configure Space**.
Managing roles requires the account\_admin role. For more information about roles, see the [Roles](/managed-service/organizations-accounts#roles) section in [Organizations and accounts](/managed-service/organizations-accounts), and the [Account permissions](/security/rbac/account-permissions) section of [Role-based access control](/security/rbac) that specifies permissions for **CREATE USER**.
## Set up a new user
To set up a new user, complete the following steps:
1. Create a new login or service account. The following section provides information about creating a new login, for human access to Firebolt. If you want to set up a new user for programmatic access, see [Create a service account](/guides/managing-your-organization/service-accounts#create-a-service-account).
2. Create a new user.
3. Link the user with a login or a service account.
4. Create a role.
5. Assign the role to the user.
The following sections guide you through the previous steps.
### Set up a new user for programmatic access
You can [add](#set-up-a-new-user), [edit](#edit-an-existing-user) or [delete](#deleting-an-existing-user) users using SQL in the **Develop Space** or using the user interface (UI) in the **Configure Space**.
Managing roles requires the account\_admin role. For more information about roles, see the [Roles](/managed-service/organizations-accounts#roles) section in [Organizations and accounts](/managed-service/organizations-accounts), and the [Account permissions](/security/rbac/account-permissions) section of [Role-based access control](/security/rbac) that specifies permissions for **CREATE USER**.
## Set up a new user
To set up a new user, complete the following steps:
1. Create a new login or service account. The following section provides information about creating a new login, for human access to Firebolt. If you want to set up a new user for programmatic access, see [Create a service account](/guides/managing-your-organization/service-accounts#create-a-service-account).
2. Create a new user.
3. Link the user with a login or a service account.
4. Create a role.
5. Assign the role to the user.
The following sections guide you through the previous steps.
### Set up a new user for programmatic access
```text theme={"theme":{"light":"css-variables","dark":"css-variables"}}
┌─────────────────┐ ┌────────┐ ┌────────┐ ┌────────┐ ┌──────────┐
│ Service account │───▶│ User │───▶│ Link │───▶│ Role │───▶│ Assign │
└─────────────────┘ └────────┘ └────────┘ └────────┘ └──────────┘
```
To set up a user for programmatic access, [create a service account](/guides/managing-your-organization/service-accounts#create-a-service-account), and then complete the steps in the following sections to [create a user](#create-a-user), [link the user](#link-the-user-to-the-login-or-service-account) to a service account, [create a role](#create-a-role), and [assign the role](#assign-a-role-to-a-user) to the user.
### Set up a new user for human access
#### Create a login
```text theme={"theme":{"light":"css-variables","dark":"css-variables"}}
┌────────┐ ┌────────┐ ┌────────┐ ┌────────┐ ┌──────────┐
│ Login │───▶│ User │───▶│ Link │───▶│ Role │───▶│ Assign │
└────────┘ └────────┘ └────────┘ └────────┘ └──────────┘
▲
```
A login is an **email** that is used for authentication. A login can be associated with multiple accounts. When you set up a new user, you must create either a login or service account for them. Create a login if you want to associate a user with human access to Firebolt. [Create a service account](/guides/managing-your-organization/service-accounts#create-a-service-account) for programmatic access. You will link the user to **either** a login or a service account.
##### Create a login using the UI
Login to [Firebolt’s Workspace](https://go.firebolt.io/login). If you haven’t yet registered with Firebolt, see the [Get Started](/overview/quickstart) guide. If you encounter any issues, reach out to [support@firebolt.io](mailto:support@firebolt.io) for help. Then, do the following:
1. Select the Configure icon ( ) in the left navigation pane to open the **Configure Space**.
2. Select **Logins**.
3. Select **Create Login**.
4. In the **Create login** window that pops up, enter the following:
1. First Name - The first name of the user.
2. Last Name - The last name of the user.
3. Login Name - The email address of the user.
5. Select a network policy from the drop-down list. You can choose **Default** or create your own. The default network policy accepts traffic from any IP address. For more about network policies, including how to create a new policy, see [Manage network policies](/managed-service/security/network-policies).
6. Toggle the following options on or off to select the following:
1. Is password enabled - Toggle **on** to require authentication using a password.
2. Is MFA enabled - Toggle **on** to require authentication using multi-factor authentication (MFA).
3. Is organization admin - Toggle **on** to grant that login permissions associated with an **Organization Admin**. A user must have organization administrative privileges to manage logins and service accounts. For more information about organization administrative privileges and other roles, see the [Roles](/managed-service/organizations-accounts#roles) section in [Organizations and accounts](/managed-service/organizations-accounts).
7. Select **Create**.
##### Create a login using SQL
Login to [Firebolt’s Workspace](https://go.firebolt.io/login). If you haven’t yet registered with Firebolt, see the [Get Started](/overview/quickstart) guide. If you encounter any issues, reach out to [support@firebolt.io](mailto:support@firebolt.io) for help. Then, do the following:
1. Select the **Develop** icon (**\**).
By default, when you login to **Firebolt’s Workspace** for the first time, Firebolt creates a tab in the **Develop Space** called **Script 1**. The following apply:
* The database that **Script 1** will use is located directly below the tab name. If you want to change the database, select another database from the drop-down list.
* An engine must be running to process the script in a selected tab. The name and status of the engine that **Script 1** uses for computation is located to the right of the current selected database. If the engine has auto-start set to `TRUE`, it will start from a stopped state. For more information about auto-start, see [Immediately Starting or Automatically Stopping an Engine](/managed-service/operate-engines/working-with-engines-using-ddl#automatically-start-or-stop-an-engine).
2. Select a running engine from the drop-down next to the engine name, or start an engine you created.
3. Use the syntax in the following example code to create a login in the SQL Script Editor:
```sql theme={"theme":{"light":"css-variables","dark":"css-variables"}}
CREATE LOGIN ""
WITH FIRST_NAME =
LAST_NAME = ;
```
#### Create a user
) in the left navigation pane to open the **Configure Space**.
2. Select **Logins**.
3. Select **Create Login**.
4. In the **Create login** window that pops up, enter the following:
1. First Name - The first name of the user.
2. Last Name - The last name of the user.
3. Login Name - The email address of the user.
5. Select a network policy from the drop-down list. You can choose **Default** or create your own. The default network policy accepts traffic from any IP address. For more about network policies, including how to create a new policy, see [Manage network policies](/managed-service/security/network-policies).
6. Toggle the following options on or off to select the following:
1. Is password enabled - Toggle **on** to require authentication using a password.
2. Is MFA enabled - Toggle **on** to require authentication using multi-factor authentication (MFA).
3. Is organization admin - Toggle **on** to grant that login permissions associated with an **Organization Admin**. A user must have organization administrative privileges to manage logins and service accounts. For more information about organization administrative privileges and other roles, see the [Roles](/managed-service/organizations-accounts#roles) section in [Organizations and accounts](/managed-service/organizations-accounts).
7. Select **Create**.
##### Create a login using SQL
Login to [Firebolt’s Workspace](https://go.firebolt.io/login). If you haven’t yet registered with Firebolt, see the [Get Started](/overview/quickstart) guide. If you encounter any issues, reach out to [support@firebolt.io](mailto:support@firebolt.io) for help. Then, do the following:
1. Select the **Develop** icon (**\**).
By default, when you login to **Firebolt’s Workspace** for the first time, Firebolt creates a tab in the **Develop Space** called **Script 1**. The following apply:
* The database that **Script 1** will use is located directly below the tab name. If you want to change the database, select another database from the drop-down list.
* An engine must be running to process the script in a selected tab. The name and status of the engine that **Script 1** uses for computation is located to the right of the current selected database. If the engine has auto-start set to `TRUE`, it will start from a stopped state. For more information about auto-start, see [Immediately Starting or Automatically Stopping an Engine](/managed-service/operate-engines/working-with-engines-using-ddl#automatically-start-or-stop-an-engine).
2. Select a running engine from the drop-down next to the engine name, or start an engine you created.
3. Use the syntax in the following example code to create a login in the SQL Script Editor:
```sql theme={"theme":{"light":"css-variables","dark":"css-variables"}}
CREATE LOGIN ""
WITH FIRST_NAME =
LAST_NAME = ;
```
#### Create a user
```text theme={"theme":{"light":"css-variables","dark":"css-variables"}}
┌────────┐ ┌────────┐ ┌────────┐ ┌────────┐ ┌──────────┐
│ Login │───▶│ User │───▶│ Link │───▶│ Role │───▶│ Assign │
└────────┘ └────────┘ └────────┘ └────────┘ └──────────┘
▲
```
After you create a login, the next step is to create a user.
##### Create a user using the UI
1. Select the Govern icon ( ) in the left navigation pane to open the **Govern Space**.
2. Select **Users** from the left sub-menu bar.
3. Select the **+ Create User** button at the top right of the **Govern Space**.
4. In the **Create User** window, enter the following:
1. **User name** - The name of the user to associate with the login. This name can be any string, excluding spaces, and special characters such as exclamation points (!), percent signs (%), at sign(@), dot sign (.), underscore sign (\_), minus sign (-), and asterisks (\*).
2. **Assign to** - Use the dropdown to assign the user to one of the following:
i. **Unassigned** - No specific assignment.
ii. **Login** - Associates the user with a login name or email address. After selecting this option, you will be prompted to choose the login name or email address.
iii. **Service Account** - Associates the user with a service account. After selecting this option, you will be prompted to choose a service account name.
3. **Role** - Select the role you want to assign to the user. If no role is specified, the user is automatically granted a [public role](/managed-service/organizations-accounts#public-role). For more information about roles, see the [Roles](/managed-service/organizations-accounts#roles) section in [Organization and accounts](/managed-service/organizations-accounts).
4. **Default Database** - Choose a database to associate with the user, setting it as their default for access.
5. **Default Engine** - Choose a default processing engine to associate with the user.
5. Select **Create new user** to save the configuration.
##### Create a user using SQL
Use the syntax in the following example code and the [CREATE USER](/reference-sql/commands/access-control/create-user) statement to create a user in the **SQL Script Editor** in the **Develop Space**:
```sql theme={"theme":{"light":"css-variables","dark":"css-variables"}}
CREATE USER ;
```
You can also create a user and link it to a login simultaneously as shown in the following code example:
```sql theme={"theme":{"light":"css-variables","dark":"css-variables"}}
CREATE USER WITH LOGIN = "";
```
Create a user and link it to a service account at the same time as shown in the following code example:
```sql theme={"theme":{"light":"css-variables","dark":"css-variables"}}
CREATE USER WITH SERVICE_ACCOUNT=
```
#### Link the user to the login or service account
) in the left navigation pane to open the **Govern Space**.
2. Select **Users** from the left sub-menu bar.
3. Select the **+ Create User** button at the top right of the **Govern Space**.
4. In the **Create User** window, enter the following:
1. **User name** - The name of the user to associate with the login. This name can be any string, excluding spaces, and special characters such as exclamation points (!), percent signs (%), at sign(@), dot sign (.), underscore sign (\_), minus sign (-), and asterisks (\*).
2. **Assign to** - Use the dropdown to assign the user to one of the following:
i. **Unassigned** - No specific assignment.
ii. **Login** - Associates the user with a login name or email address. After selecting this option, you will be prompted to choose the login name or email address.
iii. **Service Account** - Associates the user with a service account. After selecting this option, you will be prompted to choose a service account name.
3. **Role** - Select the role you want to assign to the user. If no role is specified, the user is automatically granted a [public role](/managed-service/organizations-accounts#public-role). For more information about roles, see the [Roles](/managed-service/organizations-accounts#roles) section in [Organization and accounts](/managed-service/organizations-accounts).
4. **Default Database** - Choose a database to associate with the user, setting it as their default for access.
5. **Default Engine** - Choose a default processing engine to associate with the user.
5. Select **Create new user** to save the configuration.
##### Create a user using SQL
Use the syntax in the following example code and the [CREATE USER](/reference-sql/commands/access-control/create-user) statement to create a user in the **SQL Script Editor** in the **Develop Space**:
```sql theme={"theme":{"light":"css-variables","dark":"css-variables"}}
CREATE USER ;
```
You can also create a user and link it to a login simultaneously as shown in the following code example:
```sql theme={"theme":{"light":"css-variables","dark":"css-variables"}}
CREATE USER WITH LOGIN = "";
```
Create a user and link it to a service account at the same time as shown in the following code example:
```sql theme={"theme":{"light":"css-variables","dark":"css-variables"}}
CREATE USER WITH SERVICE_ACCOUNT=
```
#### Link the user to the login or service account
```text theme={"theme":{"light":"css-variables","dark":"css-variables"}}
┌────────┐ ┌────────┐ ┌────────┐ ┌────────┐ ┌──────────┐
│ Login │───▶│ User │───▶│ Link │───▶│ Role │───▶│ Assign │
└────────┘ └────────┘ └────────┘ └────────┘ └──────────┘
▲
```
If the user wasn’t associated with a login or service account when they were created, you must link them.
##### Link a user using the UI
1. Select the Govern icon () in the left navigation pane to open the **Govern Space**.
2. Select **Users** from the left sub-menu bar.
3. Select the three horizontal dots (…) to the right of the user that you need to link to a login.
4. Select **Edit user details**.
5. If you want to link the user to a login for human access, select **Login** from the drop-down list next to **Assign to**. If you want to link the user to a service account for programmatic access, select **Service Account** from the drop-down list next to **Assign to**.
6. If you want to link the user to a login for human access, select the name of the login to associate with the user from the drop-down list under **Login name**. If you want to link the user to a service account for programmatic access, select a name from the drop-down list next to **Service account name**. This drop-down list contains only login accounts that are not already assigned to a user in the current account.
7. Select **Save**.
##### Link a user using SQL
Use the syntax in the following example code and the [ALTER\_USER](/reference-sql/commands/access-control/alter-user) statement to link a user to a login in the **SQL Script Editor** in the **Develop Space**:
```sql theme={"theme":{"light":"css-variables","dark":"css-variables"}}
ALTER USER SET LOGIN = "";
```
The following code links a user to a service account:
```sql theme={"theme":{"light":"css-variables","dark":"css-variables"}}
ALTER USER SET SERVICE_ACCOUNT =
```
#### Create a role
```text theme={"theme":{"light":"css-variables","dark":"css-variables"}}
┌────────┐ ┌────────┐ ┌────────┐ ┌────────┐ ┌──────────┐
│ Login │───▶│ User │───▶│ Link │───▶│ Role │───▶│ Assign │
└────────┘ └────────┘ └────────┘ └────────┘ └──────────┘
▲
```
If you don’t already have a role that you want to assign to a user, you can create a role to define what actions users can perform. For more information, see [Roles](/managed-service/organizations-accounts#roles).
##### Create a role using the UI
1. Select the Govern icon () in the left navigation pane to open the **Govern Space**.
2. Select **Roles** from the left sub-menu bar.
3. Select the **+ New Role** button at the top right of the **Govern Space**.
4. In the left sub-menu bar, enter the following:
1. Role name - The name of the role that you want to create. You can use this role to grant privileges for more than one user.
5. Select **Databases** in the left sub-menu bar, and select the following in **Database privileges**:
1. **Create database** - Toggle **on** to allow the user to create any database in the account.
2. **Modify any database** - Toggle **on** to allow the user to modify any database in the account, or keep the option **off** to select the specific database the user can modify.
3. **Usage any database** - Toggle **on** to allow the user to use any database in the account, or keep the option **off** to select the specific database the user can use.
4. If you didn’t specify using or modifying all databases, select the checkbox next to the specific database that you want to grant the user access to modify or use.
6. Select **Engines** in the left sub-menu bar, and select the following in **Engine privileges**:
1. **Create engine** - Toggle **on** to allow the user to create any engine in the account.
2. **Modify any engine** - Toggle **on** to allow the user to modify any engine in the account, or keep the option **off** to select the specific engine the user can modify.
3. **Operate any engine** - Toggle **on** to allow the user to stop or start any engine in the account, or keep the option **off** to select the specific engine the user can start or stop. Running engines accumulate usage costs.
4. **Usage any engine** - Toggle **on** to allow the user to use any engine in the account, or keep the option **off** to select the specific engine the user can use.
7. Select **Create**.
##### Create a role using SQL
Use the syntax in the following example code and the [CREATE ROLE](/reference-sql/commands/access-control/create-role) and [GRANT](/reference-sql/commands/access-control/grant) statements to create a role in the **SQL Script Editor** in the **Develop Space**:
```sql theme={"theme":{"light":"css-variables","dark":"css-variables"}}
CREATE ROLE ;
```
Use the following code to grant engine **access to a role**:
```sql theme={"theme":{"light":"css-variables","dark":"css-variables"}}
GRANT USAGE ON ENGINE TO
```
Use the following code example to grant a role permission to **modify a database**:
```sql theme={"theme":{"light":"css-variables","dark":"css-variables"}}
GRANT MODIFY ON DATABASE TO
```
Use the following code example to grant a role permission to **create objects inside the public schema**:
```sql theme={"theme":{"light":"css-variables","dark":"css-variables"}}
GRANT CREATE ON SCHEMA public TO
```
Use the following code to grant a role permission to **access the public schema** in a database:
```sql theme={"theme":{"light":"css-variables","dark":"css-variables"}}
GRANT USAGE ON SCHEMA public TO
```
Use the following code example to grant a role permission to **read data from a specified table**:
```sql theme={"theme":{"light":"css-variables","dark":"css-variables"}}
GRANT SELECT ON TABLE TO
```
For more information about role-based access, see [Manage role-based access control](/security/guides/rbac).
#### Assign a role to a user
```text theme={"theme":{"light":"css-variables","dark":"css-variables"}}
┌────────┐ ┌────────┐ ┌────────┐ ┌────────┐ ┌──────────┐
│ Login │───▶│ User │───▶│ Link │───▶│ Role │───▶│ Assign │
└────────┘ └────────┘ └────────┘ └────────┘ └──────────┘
▲
```
You can assign a new role to the user or change the role assigned to the user from the default **public** role to grant them specific permissions. A user can have multiple roles.
##### Assign a role using the UI
1. Select the Govern icon () in the left navigation pane to open the **Govern Space**.
2. Select **Users** from the left sub-menu bar.
3. Select the three horizontal dots (…) to the right of the user that you need to link to a login.
4. Select **Edit user details**.
5. Select the checkbox next to the role that you want to assign to the user from the list under **Assign Roles**.
6. Select **Save**.
##### Assign a role using SQL
Use the syntax in the following example code and the [GRANT](/reference-sql/commands/access-control/grant) statement to assign a role in the **SQL Script Editor** in the **Develop Space**:
```sql theme={"theme":{"light":"css-variables","dark":"css-variables"}}
GRANT ROLE TO USER ;
```
You can use `GRANT` to assign a role to another role as follows:
```sql theme={"theme":{"light":"css-variables","dark":"css-variables"}}
GRANT ROLE TO ROLE
```
## Edit an existing user
You can alter a user's name, login or service account that they are associated with, their default database, and engine.
### Edit a user using the UI
1. Select the Govern icon () in the left navigation pane to open the **Govern Space**.
2. Select **Users** from the left sub-menu bar.
3. Select the three horizontal dots (…) to the right of the user that you need to edit.
4. Select **Edit user details**.
5. Edit the desired fields.
6. Select **Save**.
### Edit a user using SQL
Use the [ALTER USER](/reference-sql/commands/access-control/alter-user) statement to change a user's information in the **SQL Script Editor** in the **Develop Space**.
The following code example changes a user's name:
```sql theme={"theme":{"light":"css-variables","dark":"css-variables"}}
ALTER USER "alex" RENAME TO "alexs";
```
The following code example changes a user's login:
```sql theme={"theme":{"light":"css-variables","dark":"css-variables"}}
ALTER USER alex SET LOGIN="alexs@acme.com";
```
Users can modify most of their own account settings without requiring [RBAC](/security/rbac#role-based-access-control-rbac) permissions, except when altering [LOGIN](/guides/managing-your-organization/managing-logins) configurations or a [SERVICE ACCOUNT](/guides/managing-your-organization/service-accounts).
## Deleting an existing user
You can delete a user using either the UI or with SQL. The delete operation is irreversible.
### Delete a user using the UI
1. Select **Users** from the left sub-menu bar.
2. Select the three horizontal dots (…) to the right of the user that you need to delete.
3. Select **Delete user**.
4. Select **Confirm** to delete the user. This operation is irreversible.
### Delete a user using SQL
Use the syntax in the following example code and the [DROP USER](/reference-sql/commands/access-control/drop-user) statement to delete an existing user in the **SQL Script Editor** in the **Develop Space**:
```sql theme={"theme":{"light":"css-variables","dark":"css-variables"}}
DROP USER "alex";
```