> ## Documentation Index
> Fetch the complete documentation index at: https://docs.firebolt.io/llms.txt
> Use this file to discover all available pages before exploring further.
> Understand options for loading data using a data load wizard.
# Load data using a wizard
The **Load data** wizard can help you get started loading data from an Amazon S3 bucket using a simple workflow. You can use the wizard to both create an engine and load your data.
A general workflow to load data using the **Load data** wizard is shown in the following diagram as the highlighted decision path compared to using SQL shown in the muted path:
```text theme={"theme":{"light":"css-variables","dark":"css-variables"}}
┌────────────────────┐
┌────────────────────┤ Load data wizard ├────┐
│ Load data │ 1. Create a DB │ │
│ using a wizard │ 2. Create engine │ │
│ │ 3. Load data │ │
│ └────────────────────┘ │
┌──────────────┐ │ ▼
│ Amazon S3 ├──┤ ┌───────────────────┐
│ bucket │ │ │ Firebolt database │
└──────────────┘ │ └───────────────────┘
│ ▲
│ │
│ Write SQL │
│ ┌──────────────┐ ┌──────────────┐ ┌──────┴───────┐
└──▶│ create a ├─▶│ create an ├─▶│ load data │
│ database │ │ engine │ │ │
└──────────────┘ └──────────────┘ └──────────────┘
```
The wizard also guides you through setting up an AWS connection. To use the wizard, you will need the uniform resource locator (URL) of an Amazon S3 bucket. If credentials are required to access the data that you want to load, you will also need an AWS Key ID and your AWS Secret Key. In most steps in the wizard, you can view the SQL commands associated with your selections in the **Load data** main window by selecting **Show SQL script** in the left navigation pane at the bottom of the window.
To use the wizard, use the following steps:
1. Register and/or log in to the [Firebolt Workspace](https://firebolt.go.firebolt.io/signup).
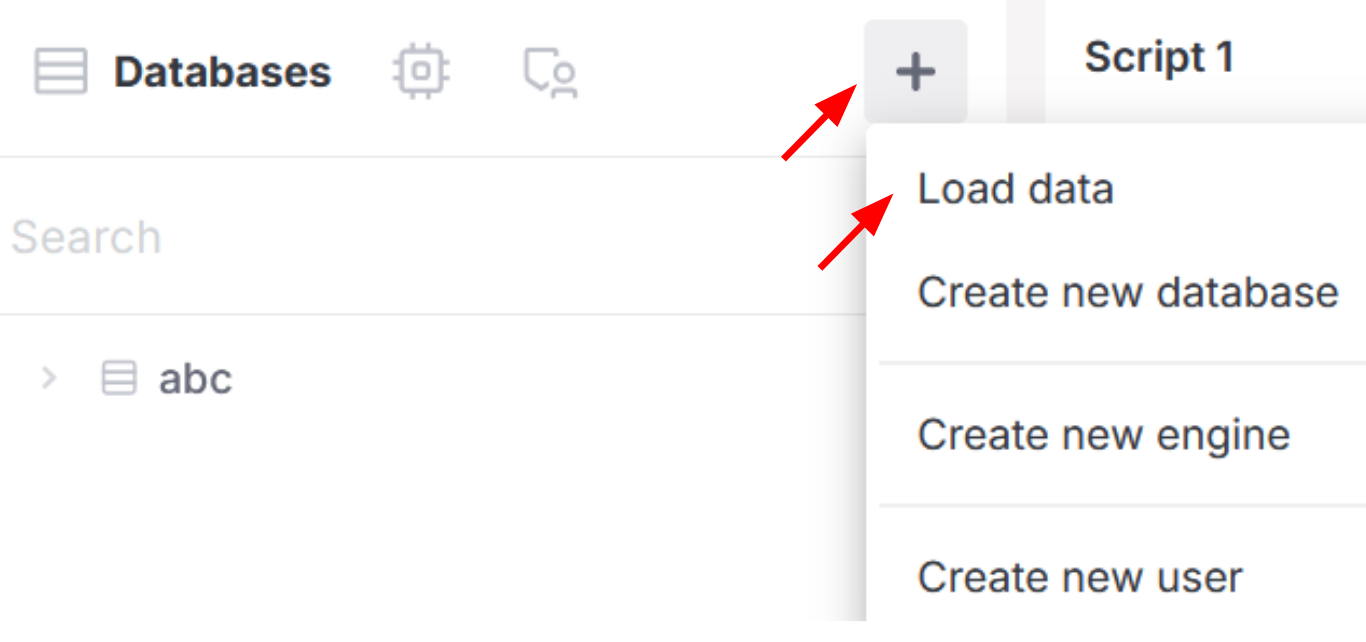
2. Select the (**+**) icon from the left navigation pane next to **Databases**.
3. Select **Load data** from the drop-down menu, as shown in the following image:
 ## Select an engine

Select an engine to load data. If the engine that you want to use already exists, select it from the dropdown list next to **Select engine for ingestion**. Otherwise, select **Create new engine** from the dropdown list, and do the following:
1. Enter a name in the **New engine name** text box.
2. Select an engine size from the drop-down list next to **Node type**. Consider the following when creating a new engine:
1. If you are loading data and using Firebolt for the first time, use the smallest engine size (S) and a small dataset to try out Firebolt’s capabilities. Refer to the [Get Started](/overview/quickstart) guide for more information.
2. If you want to load larger datasets, and a S engine provides insufficient performance, Firebolt recommends **scaling out**, or adding more nodes, first, as shown in the following diagram.
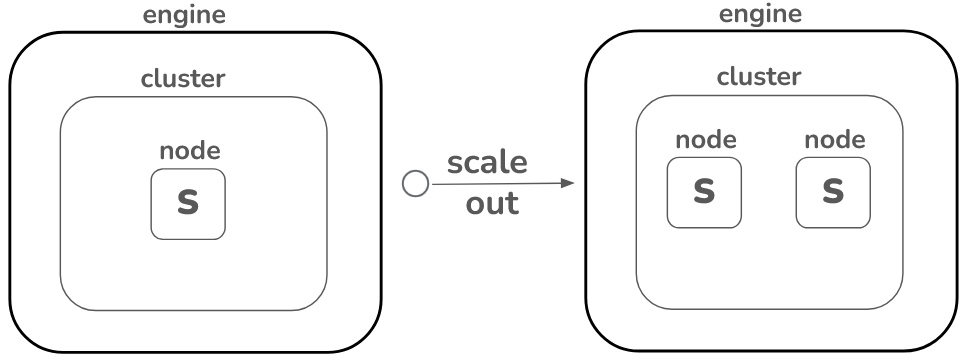
Scaling out can enhance performance for workloads with many similarly sized files, but it also increases billing costs.
For more information, see [Sizing Engines](/managed-service/operate-engines/sizing-engines).
3. Select the number of compute nodes to use to load your data next to **Number of nodes**. A node is an individual compute unit within a compute cluster.
* Using more than one node allows Firebolt to load your data and perform operations on your data in parallel on multiple nodes within a single cluster, which can speed up the data loading process.
* A higher number of nodes also means increased costs for compute resources. You can see the total cost per hour for your selection under Advanced settings, given in Firebolt Units (FBU). Each FBU is equivalent to \$0.35 US dollars per hour. Find the right balance between cost and speed for your workload. You must use at least one node.
4. Select the number of clusters next to **Number of clusters**. A cluster is a group of nodes that work together. The following apply:
* If you increase the number of clusters, you will add the number of compute nodes that you selected for each added cluster.
You can see the total cost per hour for your selection under **Advanced settings**, given in Firebolt Units (FBU). Find the right balance between cost and speed for your workload. You must use at least one cluster.
5. Select the down arrow next to **Advanced settings** for more options for your engine including setting a time to stop the engine after a period of inactivity.
## Set up AWS connection

### A. Using public data that do not require access credentials
* If the data is public and no credentials are needed, simply provide the URL of your Amazon S3 bucket and select **Next Step**.
### B. Using Private Data (Credentials Required)
If the data requires credentials for access, you must provide them so that Firebolt can retrieve it from AWS on your behalf. You can choose either **Static Credentials** or **Assume Role Authentication**.
* Use static credentials for simplicity and persistent access when security risks are low, and if your environment requires minimal configuration.
* Use **[AssumeRole](https://docs.aws.amazon.com/STS/latest/APIReference/API_AssumeRole.html) Authentication** for enhanced security, temporary access, and dynamic role management, particularly in environments requiring fine-grained permissions or cross-account access.
#### 1. Static Credentials
1. Provide the **URL** for your Amazon S3 bucket.
2. Enter your **AWS Key ID** and **AWS Secret Key**.
3. For authentication:
* Select **Access Key ID & Secret Key** as your authentication method.
* The **AWS Key ID** is a 20-character string associated with an AWS user or IAM role (e.g., `AKIAIOSFODNN7EXAMPLE`).
* The **AWS Secret Key** is a 40-character string linked to the AWS Key ID (e.g., `wJalrXUtnFEMI/K7MDENG/bPxRfiCYEXAMPLEKEY`).
* Optionally, you can also specify an **AWS Session Token**.
* For more information about these credentials, see [Create Access Key and Secret ID in AWS](/guides/loading-data/creating-access-keys-aws).
4. Select **Next Step**.
#### 2. Assume Role Authentication
1. Select **IAM Role** as your authentication method.
2. Select **Create an IAM role**. To allow Firebolt to read and write to your Amazon S3 bucket using dynamic credentials, you must do the following:
* Create an IAM Role.
* Define an **AssumeRole** Policy.
3. After the role is created in your AWS account and the trust policy is attached, copy the **Amazon Resource Name (ARN)** of the role to your clipboard.
4. Paste the ARN into the **Amazon Resource Name** field in Firebolt.
5. Select **Next Step**.
#### 3. Using Firebolt's Test Dataset (If You’re Not Ready with Your Own Data)
If you don't have your own data ready, you can use Firebolt’s sample dataset from the fictional company "Ultra Fast Gaming Inc.":
* Use the following Amazon S3 bucket URL:
`s3://firebolt-publishing-public/help_center_assets/firebolt_sample_dataset/`.
Alternatively, you can click the toggle button next to **Use Firebolt Playground Bucket to load sample data**.
4. Select **Next step**.
## Select data to ingest

1. Select the data file that you want to load. Firebolt’s **Load data** wizard currently supports files in both CSV and Parquet formats. The contents of your S3 bucket are shown automatically along with their object type, size, and when the object was last modified.
2. Enter text or a [prefix](https://docs.aws.amazon.com/AmazonS3/latest/userguide/using-prefixes.html) into the search field above **FILE NAME** to filter the list of objects. You can enter either part of the object's name or the full prefix that it starts with.
3. Select one file. Firebolt does not support selecting multiple files, or selecting folders.
4. If you are using Firebolt's test data, select box next to `levels.csv`.
5. Select **Next step**.
## Set up destination

Specify the table inside a database that you want to load your data into.
1. You can either select an existing database from the drop-down list next to **Select database** or **Create new database**.
1. If you created a new database, enter a new database name and a new table to load your data into. Select **Next step**.
2. If you selected an existing database, select the table in the database from the drop-down list next to **Select table**, or **Create new table** and provide a new table name.
2. Select **Next step**.
## Format data

A default formatting and error handling scheme shows a preview of your data. You can change the default configuration using the following options:
1. Toggle off **Use default formatting** to show custom formatting options. You can specify options including different file delimiter, quote character, and escape character.
* Enter a new value in the text box or select an option from the drop-down arrow next to the option that you want to change.
* After each change, the data preview changes to reflect your selection.
2. Toggle off **Use default error handling** to show the following additional error handling options:
* You can specify a file to write errors to. Enter the name of the file that you want to write including the URL address for an Amazon S3 bucket that contains that file, and your AWS credentials. Firebolt will use these credentials to write an error file on your behalf. The output file should be in the following format:
```sql theme={"theme":{"light":"css-variables","dark":"css-variables"}}
s3:///>
```
* **Max errors per file** - Specify the percentage of errors you want to allow during data loading. By default, the maximum is set to `0%`, meaning any error will stop the loading process. If you wish to continue loading despite errors, set **Max errors per file** to a non-zero value. For example, entering `10%` or `10` allows the process to continue until errors affect `10%` of the rows.
3. Select **Next step**.
## Map data

Map the values in your data to columns into the target table. Firebolt automatically detects the schema of your data and displays information including the detected column names, type, and a preview of the data in the next window. By default, each column has a checkbox next to its name. Deselect the box if you don’t want to load the column. You can adjust the schema for the following items:
1. **Type** - you can change the [data type](/reference-sql/data-types) of the column.
2. **Nullable** - toggle this switch to `ON` if the columns in your data can contain `NULL` values. If this value is toggled off for a column, and that column contains `NULL` values, then the wizard will generate an error and stop loading.
3. **Primary index** - toggle this switch to `ON` for the columns you want to include in your primary index.
* One of Firebolt’s key optimization strategies is to use a primary index that ties to columns that are used frequently in `WHERE`, `JOIN`, `GROUP_BY`, and other clauses used for sorting. Selecting the best primary index, which is a sparse index, can reduce query run times significantly by reducing the data set that the query scans. A primary index also allows Firebolt to manage updates, deletions and insertions to tables and provide optimal query performance.
* It's best if you choose a primary index based on knowledge about your data and query history. If you don't know which column(s) to select, you can use Firebolt's suggested primary indexes by keeping **Automatically assign primary indexes** checked, as shown in the following image:

Using Firebolt's suggested primary index is preferable to having none. In the absence of a query history, Firebolt prioritizes choosing a column for the primary index in the following order: a datetime or timestamp column, a column with low cardinality, or the first column.
* If you include multiple columns as a composite primary index, they will be added in sort order. For example, if you select `column_1` first, then select `column_3`, then `column_3` will be added as a primary index after `column_1`. This means `column_1` will be used first as a sparse index, followed by `column_3`. If you choose more than one primary index, the order of sorting appears next to the toggle switch under the **Primary Index** column. In the previous example, the number `1` appears next to `column_1` and a number `2` appears next to `column_3`. To achieve optimal results, choose indexes in the ascending order of their cardinality, or the number of unique values. Start with the column that has the lowest number of unique values as your first primary index, followed by the column with the next cardinality. For more information about how to choose a primary index, see [Primary index](/performance-and-observability/storage-and-indexing/primary-index).
4. Select **Next step**.
## Review configuration
The **Review configuration** window displays your selections in SQL code. If you want to change the configuration, you must go back through the **Load data** wizard workflow to the section that you want to change and amend your selection. You cannot edit the SQL code in the **Review configuration** window.
1. Select **Run ingestion** to load your data. The **Load data** wizard completes and your configuration will run in the **Develop Space** inside the **Firebolt Workspace**. The main window in the **SQL editor** contains the SQL script that configures your load data selections, and may contain several queries.
## View results and query statistics
 After your load data job completes, you can view the results of each query that was configured by the **Load data** wizard in Firebolt user interface under **Results** in the bottom window. If you need to edit the queries, you can enter the change into the **SQL Editor** directly and select **Run**.
1. View information about your query in the **Statistics** tab. This information contains the status of the query, how long it took to run, and the number of rows processed during the data loading job.
2. View metrics in the **Query Profile** tab for each operator used in your query. Select an operation to view metrics. These metrics include the following:
1. The output cardinality - the number of rows each operator produced.
2. The thread time - the sum of the wall clock time that threads spent to run the selected operation across all nodes.
3. The CPU time - the sum of the time that threads that ran the operator were scheduled on a CPU core.
4. The output types - the data types of the result of the query.
You can use metrics in the **Query Profile** tab to analyze and measure the efficiency and performance of your query. For example, If the CPU time is much smaller than thread time, the input-output (IO) latency may be high or the engine that you are using may be running multiple queries at the same time. For more information, see [Example with ANALYZE](/reference-sql/commands/queries/explain).
3. View monitoring information including the percent CPU, memory, disk use and cache read in the **Engine monitoring** tab. Information is shown from the last 5 minutes by default. Select a different time interval from the drop-down menu next to **Last 5 minutes**. You can also select the **Refresh** icon next to the drop-down menu to update the graphical information.
4. View detailed information associated with each query in the **Query history** tab. This information includes the query status, start time, number of rows and bytes scanned during the load, user and account information. You can do the following:
1. Select the **Refresh** icon to update the query history and ID.
2. Select the filter icon ( **⫼** ) to remove or add columns to display.
3. Select the **More options** icon ( **⋮** ) to export the contents of the Query history tab to a JSON or CSV file.
After your load data job completes, you can view the results of each query that was configured by the **Load data** wizard in Firebolt user interface under **Results** in the bottom window. If you need to edit the queries, you can enter the change into the **SQL Editor** directly and select **Run**.
1. View information about your query in the **Statistics** tab. This information contains the status of the query, how long it took to run, and the number of rows processed during the data loading job.
2. View metrics in the **Query Profile** tab for each operator used in your query. Select an operation to view metrics. These metrics include the following:
1. The output cardinality - the number of rows each operator produced.
2. The thread time - the sum of the wall clock time that threads spent to run the selected operation across all nodes.
3. The CPU time - the sum of the time that threads that ran the operator were scheduled on a CPU core.
4. The output types - the data types of the result of the query.
You can use metrics in the **Query Profile** tab to analyze and measure the efficiency and performance of your query. For example, If the CPU time is much smaller than thread time, the input-output (IO) latency may be high or the engine that you are using may be running multiple queries at the same time. For more information, see [Example with ANALYZE](/reference-sql/commands/queries/explain).
3. View monitoring information including the percent CPU, memory, disk use and cache read in the **Engine monitoring** tab. Information is shown from the last 5 minutes by default. Select a different time interval from the drop-down menu next to **Last 5 minutes**. You can also select the **Refresh** icon next to the drop-down menu to update the graphical information.
4. View detailed information associated with each query in the **Query history** tab. This information includes the query status, start time, number of rows and bytes scanned during the load, user and account information. You can do the following:
1. Select the **Refresh** icon to update the query history and ID.
2. Select the filter icon ( **⫼** ) to remove or add columns to display.
3. Select the **More options** icon ( **⋮** ) to export the contents of the Query history tab to a JSON or CSV file.